As always thanks for visiting!
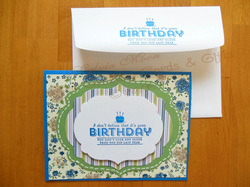
This card was made for a very special man who recently turned 70! The base of the card is on Whisper White card stock. On top of that is a piece of Coastal Cabana card stock. The next layer is a wave design from Stampin' Up! designer paper. The three fish are made from a stamp I bought from Hobby Lobby. They were stamped, colored in with markers, fussy cut and then I used Crystal Effects also from Stampin Up to coat them. I used an eyelet in the center of the designer paper which was already attached to the Coastal Cabana card stock before attaching it to the card base. I also punched holes through the tops of the fish and used a silver cord to loop them together and then through the eyelet. The cord was taped in the back and then the whole thing was attached to the card base. The greeting was stamped with Coastal Cabana ink on Whisper White card stock and attached to a piece of Coastal Cabana and then I used Stampin Dimensionals to give the card some dimension. Then I made a liner for the envelope with a repeated pattern of the fish. This was also stamped with Coastal Cabana ink and die cut with a thinlits die. The front of the envelope also was stamped with the fish. Please leave a comment if you like this card or have any questions.
As always thanks for visiting!
0 Comments
I've had this flip-style die for awhile now, but this is the first time I've used it. I've also used two different embossing folders, and an embosslit die with this card as well. I love the colors and think it is very cheery. The detail photo shows off the rhinestones a little better too! Please leave me a comment. As always thank your for visiting.
So here's how my friend Denise's card turned out. I initially wanted to do a dream catcher card for her, but couldn't quite get the logistics figured out. As it turned out we wanted to do a western theme and I found a cowboy image that I thought looked cute. Then I decided to personalize it with her face. The image was actually a coloring book page clip art so it was fun altering it. I used markers to color the outfit and went over the vest and hat with clear "Wink of Stella" and added rhinestones for the buttons and chaps decorations. It's too bad the sparkle doesn't show up because it really adds so much. My daughter had the idea of using Red Solo Cups for lighting, so we just cut slits in the bottom and slipped in the bulbs from the light strings, spacing them about 4 bulbs apart. Then she put up black and cheetah streamers around them and here is how they turned out. She also did this wanted poster and we put a plastic cow skull (purchased from Hobby Lobby) above that. What do you think?
I am somewhat blocked with my mini album, but have been doing other things. Here is a birthday card I made last week. I also began an art journal yesterday. I will post my first page either tomorrow or Wednesday. Hope you had a nice Labor Day and Thanks for visiting.
This is a birthday card I made with the stamp set from Sale-a-Bration. I cut out a piece of floral designer paper and attached that to blue card stock. On top of that I put various sizes of designer papers cut from label die cuts made on my Big Shot. I also stamped the envelope with the same stamp to tie in the theme. The cake is enhanced with crystal effects. Just wanted to share these new birthday cards with you. This one I did for a special lady who has been sweet over the past 5 years (I think it's been that long!) and always brightens my day with her smile and so many little things that make my life easier. I did this card on lucky limeade card stock from Stampin' Up! On top of that is some designer paper and lace washi tape on the right side. Then on top of that I stamped a flower and butterfly image from the nature walk stamp set. I sponged on fresh grapefruit (the color, not the actual fruit - haha) around the edges which I had grunged up. The birthday wishes stamp was also done with fresh grapefruit. The butterfly was hand colored on watercolor paper, cut out and attached with 3- dimensionals. It still looked kind of bare so I sewed two of the sides with green floss (I think that's what it's called) from a gift set I had gotten from my friend Denise (yes, CIA agent Denise*) The white flower, I thought added a nice touch. I always stamp the envelopes with a greeting as well. Then I stamped a greeting inside. All the products I used, except the floss and the tool I used to make the holes, came from Stampin' Up! *see my blog from 2/16/14 "Valentine spy treat", if you are confused! The card above I also used all Stampin' Up! products, except the white flower brad. The base of this card was also made with lucky limeade card stock. The designer paper on top of that came from a small pack of designer paper. I used a lacy corner punch on the edges to break up the pattern and also because I like the look of it. Then I used one of my three layered punches and my flower punch to make the yellow flower. It seemed too bright so I toned it down on the edges with some wild wasabi (don't you love the names of these colors?) I thought the inside needed something extra and punched the corner just to coordinate with the outside. This card is for sale and you can see it on my store page and my gallery soon.
Here are a few birthday cards; This first one is made on whisper white card stock and is stamped with gumball green and pacific point blue dots. On top of that is a Happy Birthday banner and a party hat which is stamped and glazed. The envelope is stamped with dots and happy birthday as well on both the front and the back.. This card sells for $5 plus shipping and handling. This card is also on whisper white card stock with a designer paper on top of that and then a floral washi tape and punched circles with various stamped images. The inside greeting says "lets Party". The envelope is stamped Happy Birthday. This card sells for $5 plus shipping and handling.
|
Archives
February 2016
|